Botanical Aquascaping · Layout guide
Branches above a leaf-litter floor — a practical layout guide
Build a readable branching structure above a restrained leaf floor, with planting, open routes and maintenance space planned together.
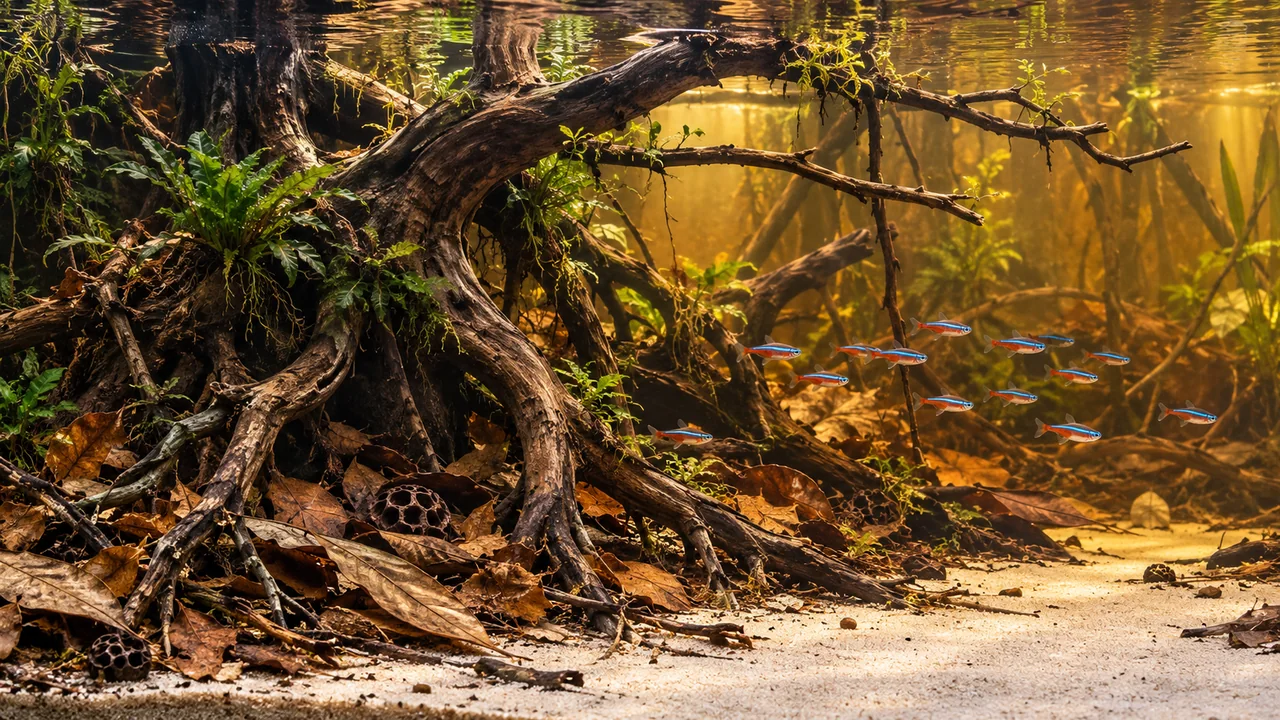
- Main structure
- Branching height with stable, accessible supports.
- Botanical floor
- Small leaf pockets with visible gaps and open ground.
- Working space
- Clear routes for flow, observation and maintenance.
Read the composition before choosing materials
The visual idea begins with a contrast: branching wood carries the height, while a much quieter floor gives it room to stand out. Follow the main branches with your eye. Notice how their direction leads through the arrangement rather than placing equal emphasis on every corner. The open foreground is part of the composition, not an unfinished area waiting for more material.
Use the approved composition as a starting point for your own arrangement. It is not a measured build plan or a documented account of one aquarium’s development. Tank dimensions, plant identities and water parameters cannot be established from the image. Any animals visible in the scene are not a stocking recommendation. Choose those separately, using the space and conditions you can actually provide.
Give the wood one clear direction
Begin with a main piece whose branching shape you find interesting from the front and from the angle at which you normally approach the aquarium. Look for a broad base, useful gaps and a line that can lead into the background. A piece does not have to reach the top of the tank to create height; the space above its tips helps define its shape.
Try the main piece in more than one orientation before adding anything around it. Turning a branch a little can reveal an open passage or make the whole arrangement feel crowded. Use a second piece to continue the direction or soften a junction, rather than introducing a competing centre of attention. Leave room between the hardscape and the glass for routine cleaning.
Make the supports stable and the gaps usable
Plan the support before dressing the base with leaves. Rest the wood securely on suitable supports and check the arrangement from the side as well as the front. Do not rely on loose litter to hold a branch in position. If a piece needs fixing, use a method and materials intended for aquarium use and follow their instructions; hidden supports still have to be safe and accessible.
Inspect openings in the finished position, including the spaces created between two separate pieces. A wide entrance can lead to a narrow interior. Judge clearance against the adult shape and behaviour of the intended occupants, then retain alternative routes around the structure. Stability and usable space matter more than matching every branch in the photograph.
Create depth with an open foreground
Place the stronger structure towards one side or behind the foreground, then let smaller branches lead back into it. You can suggest depth by overlapping a few shapes while keeping a clear line of sight between them. Avoid spreading equally sized accents evenly across the entire substrate; that makes every area compete for attention.
Keep a continuous foreground area where you can see the substrate, inspect feeding and reach settled waste. It can curve around the base of the wood instead of forming a rigid straight border. View the arrangement at normal seated height before committing to it: a route that looks open from above may disappear behind a branch when seen through the front glass.
Let leaves gather rather than carpet everything
Choose identifiable aquarium-suitable leaves and prepare them according to the exact material’s guidance. Arrange a restrained first layer around the wood’s base and in a few sheltered pockets. Let some edges overlap, but retain visible gaps and exposed ground. The aim is a floor with texture and variation, not an immediate deep pile.
Add pods or other accents only where they bring a different shape or useful surface. Keep hollow pieces easy to inspect and do not wedge them into places you cannot reach. Stop and look again after each addition. If the main branching shape has become difficult to read, remove an accent rather than filling another gap to balance it.
For larger leaf outlines, compare Dried Magnolia Leaves – Natural Aquarium Leaf Litter with Ceylon Cocoa (Cacao) Leaves – Natural Aquarium Leaf Litter. The Blackwater Botanical Box #9 – Cones, Leaves, Pods & Feature Pieces provides a broader selection of leaves and accents to choose from over time; retain the gaps that keep the main branching shape readable.
For a low woody accent among the leaf pockets, Mahogany Slices (Swietenia spp.) – Natural Botanical Slices offer a flatter shape to compare with deeper pod forms. Keep each piece removable so it adds detail without concealing the supports.
Use plants to frame the branches
Group planting around selected bases and behind parts of the structure, leaving other branches exposed. A patch of broad foliage can create a sheltered visual area; a smaller group can help the eye move towards open water. You do not need to plant every gap to make the arrangement look complete.
Give rooted plants their own clear growing space instead of burying them under leaves. Where suitable plants are attached to wood, position them so they do not hide all the branch junctions or obstruct an intended route. Choose plants for the aquarium’s actual light and maintenance conditions. The picture provides an arrangement idea, not reliable evidence of particular plant species.
Plan flow, feeding and maintenance together
Before filling out the leaf layer, identify where the filter intake, outlet and normal maintenance tools will sit. Keep access around them. Aim to retain routes through the arrangement rather than trapping a pocket of loose material behind every support. Once water is circulating, observe where leaves actually collect; the dry arrangement is only the first draft.
Leave an accessible feeding area and a place from which you can inspect the animals without dismantling the wood. Check that you can lift loose leaves, clean the glass and reach the substrate around the base. If an attractive corner cannot be maintained, simplify it now. A usable layout is more valuable than a finished photograph that is difficult to live with.
Build in a practical sequence
First, plan around the aquarium and its intended occupants, then trial the main wood and supports without livestock in the working area. Prepare the wood and botanicals using their material-specific instructions; this guide does not replace that preparation. Recheck the structure after preparation, especially if the way a piece sits or floats has changed.
Next, establish the substrate and stable hardscape, leave the foreground corridor, and position the planting. Fill carefully so the arrangement is not swept out of place, restore filtration and inspect the routes again under circulating water. This is a layout sequence, not a claim that a newly assembled aquarium is biologically ready for animals.
Finally, introduce a manageable amount of prepared loose material and watch where it settles. Add further accents only after you can assess the first addition and maintain the arrangement comfortably. Keep the normal aquarium establishment and stocking decisions separate from the moment the aquascape looks finished.
Observe how the floor develops
Leaves can move, soften and lose their original outline. Look at the actual material and the water around it rather than expecting the initial arrangement to stay fixed. Surface growth on a botanical, haze throughout the water and a film at the surface are different observations. Follow the preparation and white-film guides for the relevant checks instead of naming every change from its appearance alone.
Watch whether the open foreground remains open, whether planting is being covered and whether waste collects where you cannot remove it. Adjust a loose pocket of leaves before it becomes a reason to dismantle the whole hardscape. Water colour by itself does not tell you how much decomposing material the system is managing.
Keep the idea while allowing the aquarium to change
Review the layout as the plants grow and the loose material changes. Retain its three main ideas: readable branching height, sheltered areas around the structure and a foreground you can see and maintain. A leaf floor can remain convincing without replacing every softened leaf immediately or restoring an identical pattern each week.
If you add a material later, give it a clear purpose and check what space it will take away. The useful question is not whether the aquarium still matches the picture exactly. It is whether the arrangement remains stable, accessible and appropriate for the animals and plants you have chosen.
Supporting BBA guidance
The layout approach is explained here; these existing guides cover its preparation, space and observation decisions in more detail. They do not document the pictured aquarium.
- How to Prepare Aquarium Botanicals Safely — Material-specific preparation, gradual introduction and observation.
- Openings, Sharp Edges and Trapping Risks — Inspecting usable openings, body clearance and changing natural structures.
- Aquarium Botanicals and Live Plants — Planting space, shading and accessible botanical zones.
- Tannins vs Organic Load — Water colour is distinct from decomposing material and system load.